Thursday 9 January 2014
This tutorial was written by me on January 9, 2014.
It was made out of my own creation and any similarity is purely coincidental.
I used PSPx2 but any version will do.
Artist: Jose Cano
You can find this tube at the Cano Tubes Store HERE
Please Don't use this tube without a license.
Scrap Kit: My Life My Moment by Horseplay Pasture
You can find this kit at the Scraps From The Heart HERE
Mask: WSL 84 HERE
Filter: Eye Candy 4000
Here goes:
Let’s start
with the mask layer:
New Raster – 800 X 800.
Open P13. Open mask (WSL 84) and minimize.
SELECTIONS – SELECT ALL – Copy and paste P13 into selection.
Go to LAYERS – NEW MASK LAYER – FROM IMAGE – SOURCE LUMINANCE - CHECKED – from menu, find WSL 84 – OK. Duplicate and merge down. Re-size 115%.
This will be the frame layer:
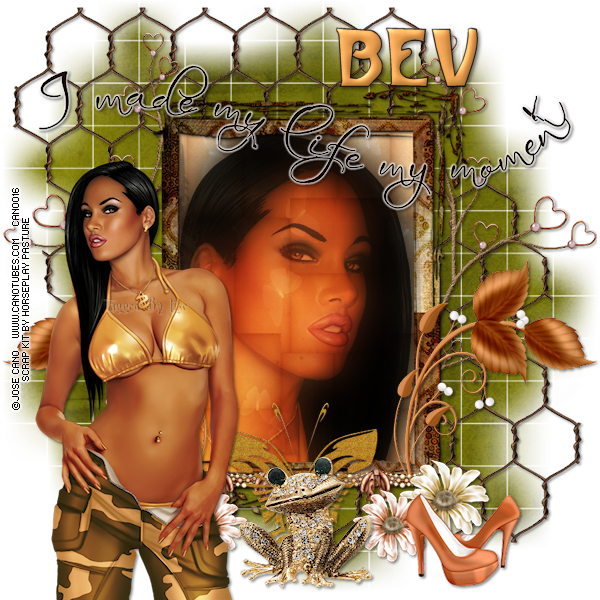
Element 23 – C/P and leave frame where it lands. Make sure your frame layer is still highlighted. Grab your selection tool. Draw a rectangle around the middle of the frame.
NEW RASTER LAYER - C/Paste into selection P3.
Keep selected.
Now grab the tube you are using. If you are using the same one as me, grab the CU of it now. C/P and move her into position.
SELECTIONS - INVERT - DELETE - SELECTIONS - INVERT. Duplicate the tube layer.
ADJUST – BLUR – GAUSSIAN BLUR – RADIUS 25 - OK.
Change BLEND MODE of copy of tube layer to HARD LIGHT and change the original tube layer to MULTIPLY and reduce opacity to 70%.
(see tag for placements)
Some elements now:
Element 31 - C/P and re-size 85%. Move to top left corner of tag. Duplicate and mirror then flip. Make sure these layers is under the frame layers.
(see tag for placement)
Element 65 - C/P and re-size 85%. Move to right middle side of tag. Duplicate and mirror. Make sure these layers are under the frame layers.
(see tag for placement)
Element 52 - C/P and re-size 60%. Move to bottom right corner of frame. Duplicate and mirror. Make sure this layer is over the frame layers.
(see tag for placement)
Element 66 - C/P and re-size 70%. Move to bottom of frame.
(see tag for placement)
Element 10 - C/P and re-size 40%. Move to bottom left corner of frame. Duplicate and mirror.
(see tag for placement)
Element 9 - C/P and re-size 35%. Move to bottom left corner of frame but to the right side of element 10.
(see tag for placement)
Element 64 - C/P and re-size 40%. Move to bottom right corner of tag.
(see tag for placement)
Element 27 - C/P and move to top middle of tag.
(see tag for placement)
I did a gradient glow around this word art. I used Eye Candy 4000 and used these settings:

New Raster – 800 X 800.
Open P13. Open mask (WSL 84) and minimize.
SELECTIONS – SELECT ALL – Copy and paste P13 into selection.
Go to LAYERS – NEW MASK LAYER – FROM IMAGE – SOURCE LUMINANCE - CHECKED – from menu, find WSL 84 – OK. Duplicate and merge down. Re-size 115%.
This will be the frame layer:
Element 23 – C/P and leave frame where it lands. Make sure your frame layer is still highlighted. Grab your selection tool. Draw a rectangle around the middle of the frame.
NEW RASTER LAYER - C/Paste into selection P3.
Keep selected.
Now grab the tube you are using. If you are using the same one as me, grab the CU of it now. C/P and move her into position.
SELECTIONS - INVERT - DELETE - SELECTIONS - INVERT. Duplicate the tube layer.
ADJUST – BLUR – GAUSSIAN BLUR – RADIUS 25 - OK.
Change BLEND MODE of copy of tube layer to HARD LIGHT and change the original tube layer to MULTIPLY and reduce opacity to 70%.
(see tag for placements)
Some elements now:
Element 31 - C/P and re-size 85%. Move to top left corner of tag. Duplicate and mirror then flip. Make sure these layers is under the frame layers.
(see tag for placement)
Element 65 - C/P and re-size 85%. Move to right middle side of tag. Duplicate and mirror. Make sure these layers are under the frame layers.
(see tag for placement)
Element 52 - C/P and re-size 60%. Move to bottom right corner of frame. Duplicate and mirror. Make sure this layer is over the frame layers.
(see tag for placement)
Element 66 - C/P and re-size 70%. Move to bottom of frame.
(see tag for placement)
Element 10 - C/P and re-size 40%. Move to bottom left corner of frame. Duplicate and mirror.
(see tag for placement)
Element 9 - C/P and re-size 35%. Move to bottom left corner of frame but to the right side of element 10.
(see tag for placement)
Element 64 - C/P and re-size 40%. Move to bottom right corner of tag.
(see tag for placement)
Element 27 - C/P and move to top middle of tag.
(see tag for placement)
I did a gradient glow around this word art. I used Eye Candy 4000 and used these settings:

Element 12 - C/P and re-size 70%. Move to bottom middle of frame.
(see tag for placement)
Element 37 - C/P and move to bottom middle of tag in front of element 12.
(see tag for placement)
I place the tube layer here:
If you are using the same tube as me, grab it now. C/P and re-size 60%. Mirror and move her to the far left corner of tag.
(see tag for placement)
Add drop shadow to layers of your
choosing.
I used
V & H 2
Opacity 70
Blur 7
Color Black
Now you can add name
and © information. Save as .png and re-size if you wish.
I re-size before I save and add
name and © info.
Let me know what you think of
this tutorial.
Subscribe to:
Post Comments
(Atom)
0 comments:
Post a Comment